How to build a video storyboard for a SaaS product in under an hour

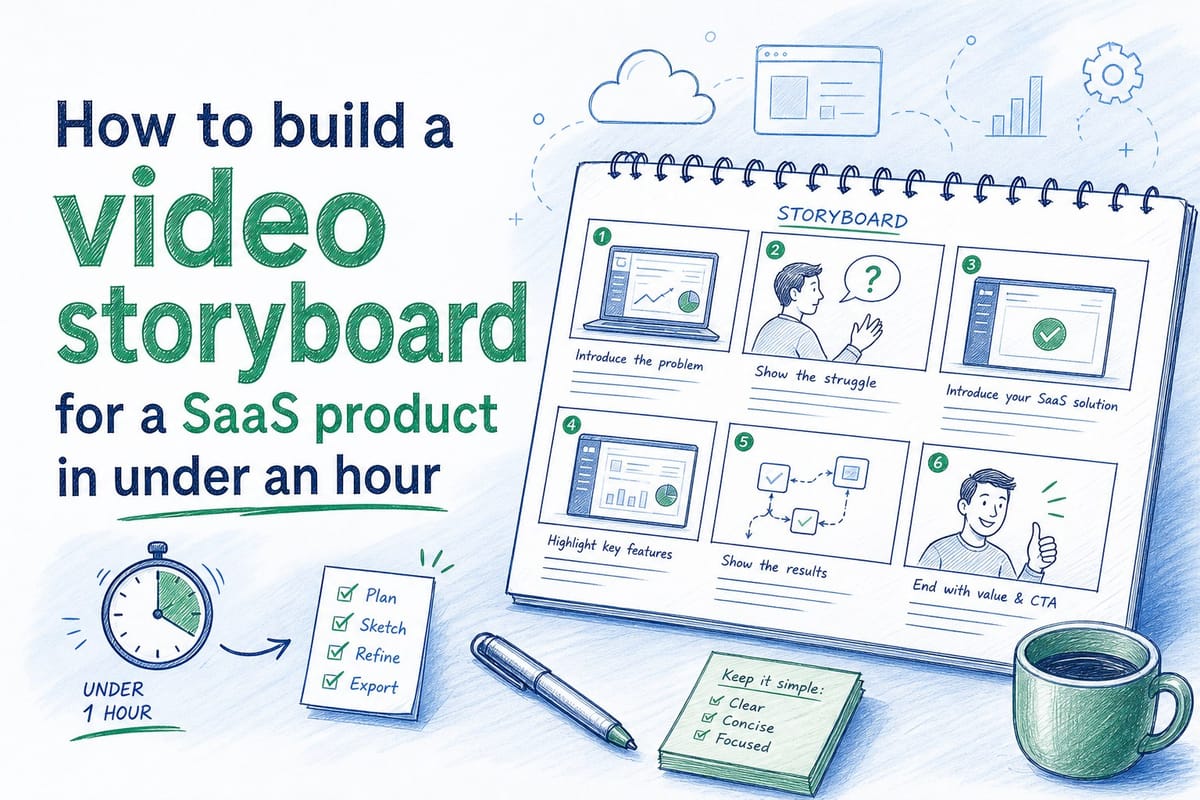
Table of contents
1. What a SaaS product storyboard actually needs to include
2. A step-by-step process for building the storyboard in under an hour
3. Keeping your SaaS product video storyboard useful after the first launch
Building a video storyboard for a SaaS product sounds like a project that takes days. You picture a creative agency, a whiteboard covered in sketches, and a week of back-and-forth emails. In reality, you can put together a solid storyboard in under an hour if you know what decisions to make upfront and in what order. I want to walk you through exactly how to do that, whether you are a founder trying to get a homepage hero video out the door, a product marketing manager keeping sales walkthroughs current across sprints, or a customer success lead who needs onboarding content that actually matches the current UI. A good video storyboard for a SaaS product does not need to be a piece of art. It needs to be a clear plan that tells your team what to show, what to say, and in what order so that the finished video does its job.
What a SaaS product storyboard actually needs to include
Let me clear something up first. A storyboard for a SaaS product video is not the same thing as a storyboard for a film or a TV ad. You are not blocking camera angles or directing actors. You are making decisions about screen states, narration, pacing, and story logic. That is a much smaller set of problems, and it is one you can solve quickly once you understand what matters.
Every storyboard for a SaaS product video needs to answer five questions before production starts.
First, what is the core job the viewer needs to get done? If you are building a homepage hero video, the viewer needs to understand what your product does and why it is different within about sixty seconds. If you are building an onboarding video, the viewer needs to get from zero to their first success moment. If you are building a sales walkthrough, the viewer needs to see themselves solving a specific problem they already know they have. Each of those is a different story, and each one needs a different storyboard structure.
Second, what is the single most important screen state you need to show? SaaS products have dozens of screens, but the best product videos pick one or two that carry the whole argument. A project management tool might anchor everything on the board view. A CRM might anchor on the pipeline. A data analytics product might anchor on the main dashboard. Pick the screen that proves your product's value most visually, and build your storyboard around it.
Third, what does the narration need to say at each moment? Narration and visuals have to work together. If your narration says 'you can see all your deals at a glance,' the screen needs to be showing the deals view right at that moment. I see a lot of SaaS product videos where the narration and the visuals are half a beat off from each other. That disconnect breaks trust with the viewer. Your storyboard is the place where you fix that problem before you spend time recording anything.
Fourth, how long does each section need to be? Product videos for SaaS tend to work best when they are short. A homepage hero video is often sixty to ninety seconds. A feature walkthrough for a sales deck might be two to three minutes. An onboarding module can go longer if it is broken into chapters. When you are building your storyboard, assign a rough time budget to each section. This keeps you honest about what you can actually cover.
Fifth, what is the call to action at the end? Every video needs to tell the viewer what to do next. Start a free trial. Book a demo. Watch the next video in the series. Write that into your storyboard from the beginning so the whole video builds toward it.
Once you have answers to those five questions, you have the skeleton of your storyboard. The rest of the work is filling in the details, and that is what the next section covers.
One thing I want to flag here is the difference between a storyboard and a script. A script is just the narration written out in order. A storyboard pairs that narration with the specific visual that belongs on screen at each moment. Both are important, but the storyboard is more useful because it forces you to think about what the viewer is actually seeing while they are hearing each line. If you only write a script, you will end up with a video where the visuals feel like an afterthought. Build the storyboard, and the script becomes part of it naturally.
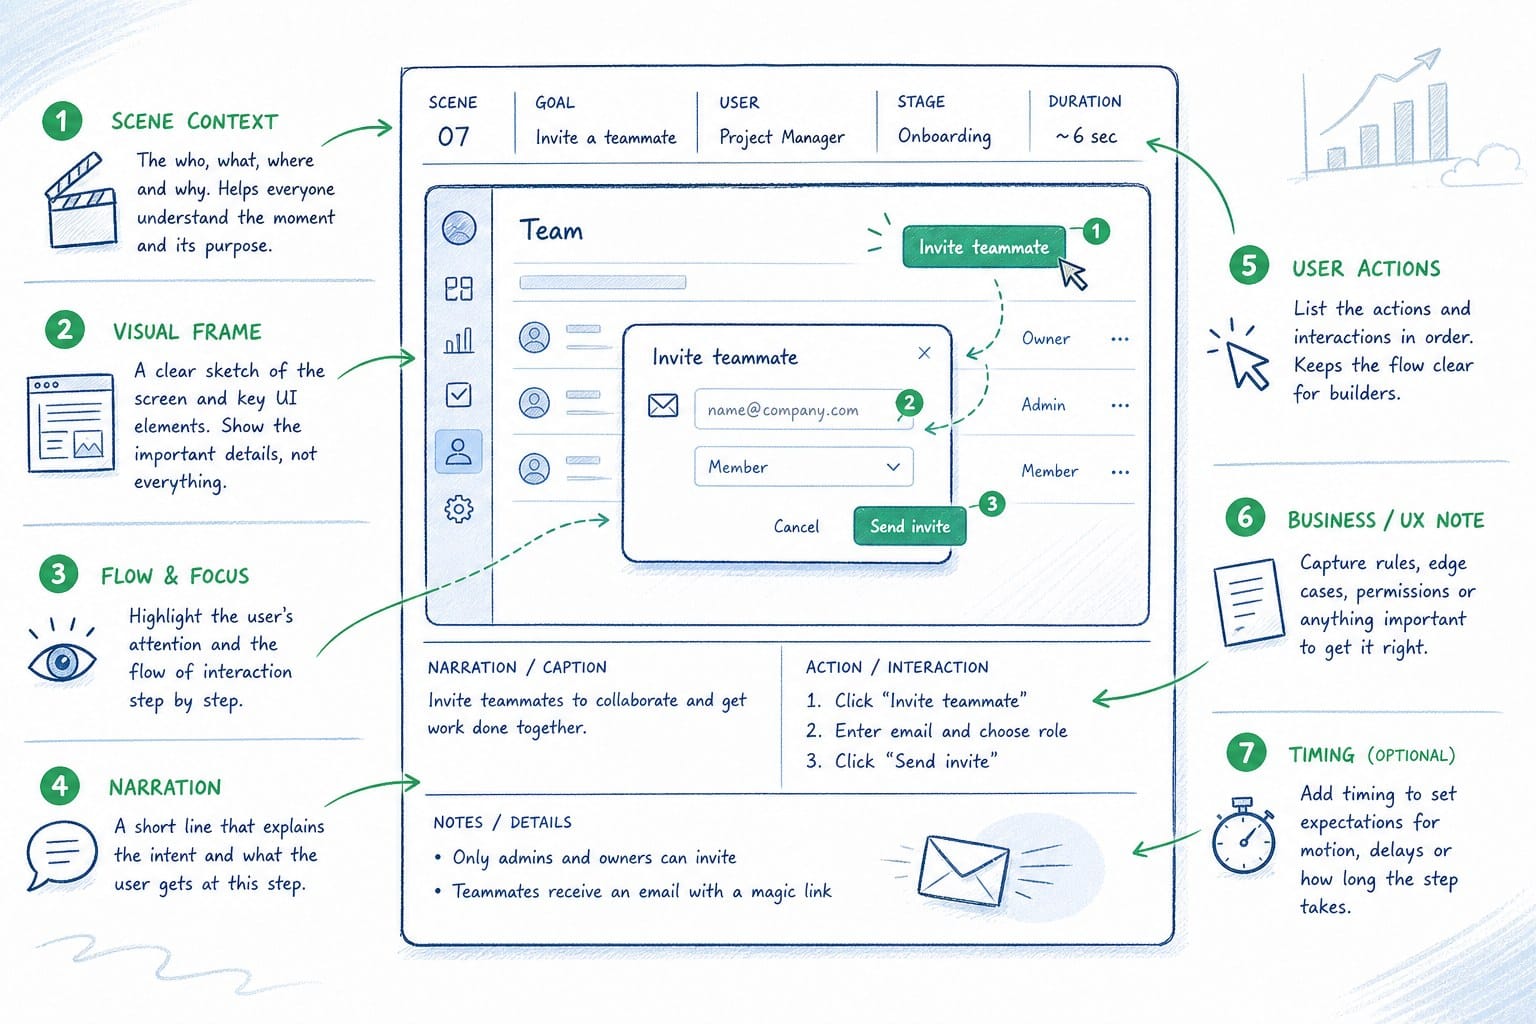
A useful format for a SaaS product storyboard is a simple table. Three columns work well. The first column is the timestamp or section label. The second column is the screen state or visual description. The third column is the narration or on-screen text. You do not need special software to make this. A Google Doc or Notion page works fine. What matters is that every row in the table represents a moment where something changes, either the visual, the narration, or both.
Here is a simple example for a two-minute feature walkthrough video. The first thirty seconds cover the problem the viewer has. The narration explains the pain point and the screen shows a generic or stylized version of the messy situation before the product is involved. The next sixty seconds cover the solution. The screen moves through the product's key screens in the order that matches the narration. The final thirty seconds cover the outcome and the call to action. The screen shows a success state or a results view, and the narration tells the viewer what to do next.
That structure works for most SaaS product videos. You can adapt the timing, add more sections for a longer onboarding video, or compress it further for a LinkedIn cut. But the basic shape stays the same: problem, solution, outcome.
I also want to mention aspect ratios here because they affect your storyboard decisions. A homepage hero video is usually horizontal, sixteen by nine. A LinkedIn or social cut might be square or vertical. If you know you need multiple formats, note that in your storyboard now. It will affect which parts of the screen you can show clearly and how much room you have for on-screen text. Building that into the plan from the start saves a lot of rework later.
A step-by-step process for building the storyboard in under an hour
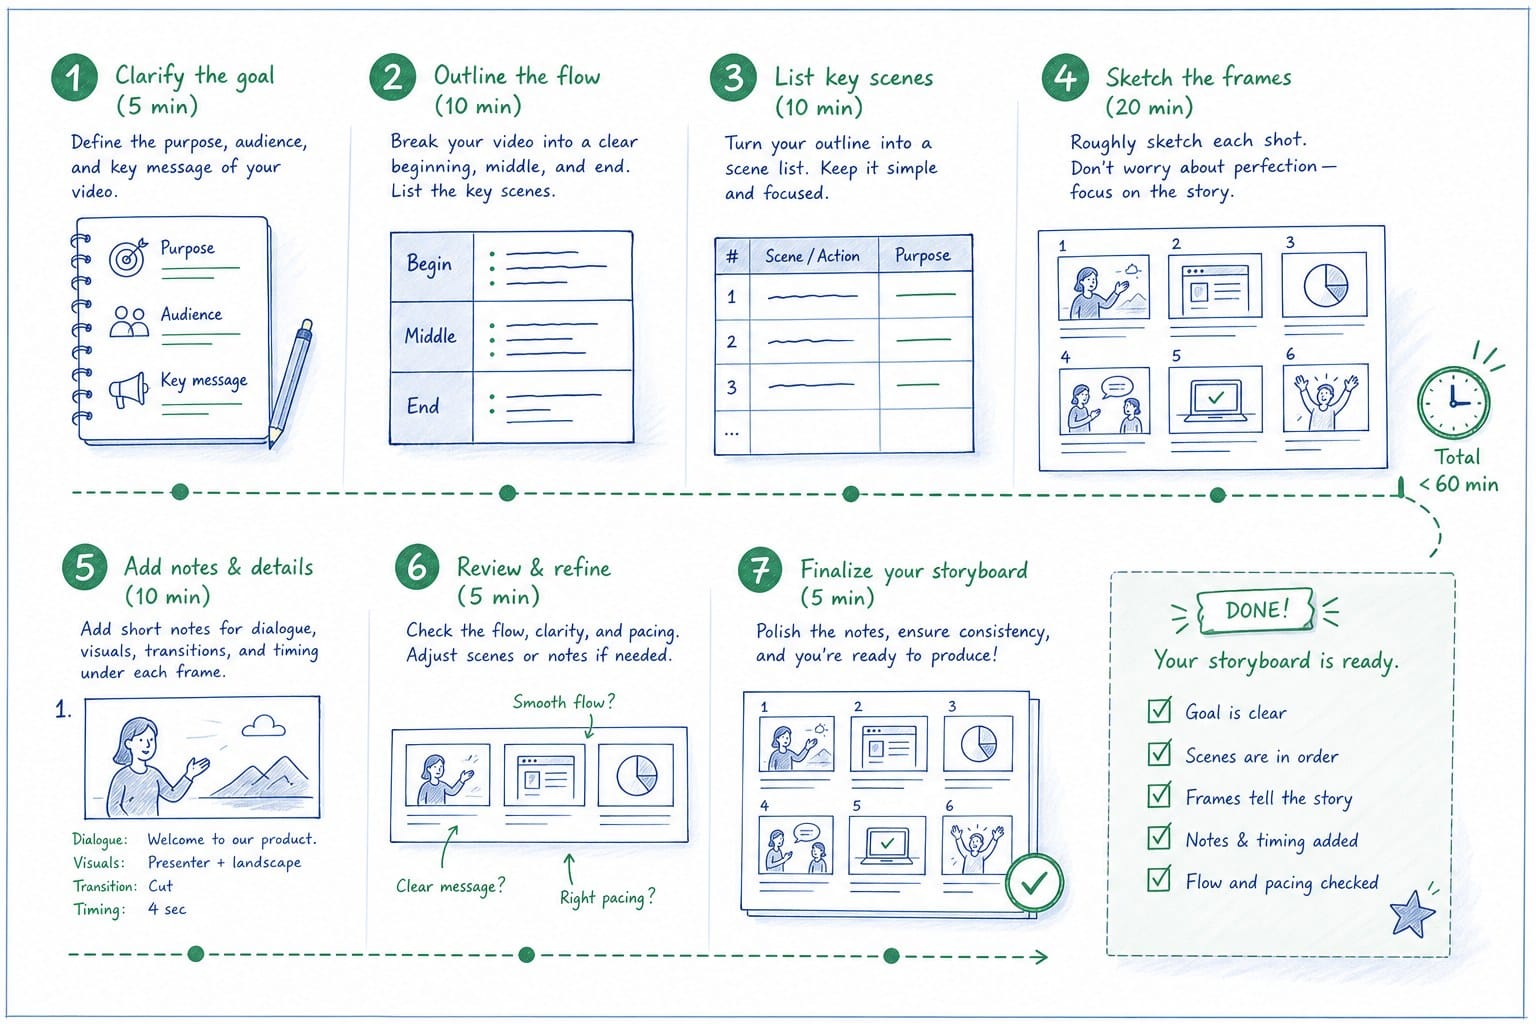
I am going to give you a specific process with time targets. If you follow this order, you will have a working storyboard in about fifty to sixty minutes. You can adjust the time targets based on how complex your product is, but the order of steps matters.
Minutes one through ten: define the audience and the goal.
Before you open a doc, decide who this video is for and what you want them to do after watching it. Write two sentences. The first sentence names the viewer and the problem they have. The second sentence names the one thing you want them to do at the end of the video. For example: 'This video is for a VP of Sales who is evaluating CRM tools and is frustrated that their current tool does not give them pipeline visibility. After watching, I want them to book a demo.' That is your north star for the whole storyboard. Every decision you make from here should serve those two sentences.
This step also forces you to pick one audience. A lot of SaaS videos try to speak to everyone and end up speaking to no one. A homepage hero video for a product-led growth company might target an individual contributor who wants to try the product themselves. A sales enablement video targets a buyer who needs to justify a purchase to their team. Those are different stories and they need different storyboards. Pick one and commit.
Minutes ten through twenty: map the screen states.
Open your product. Go through it as if you are showing it to the viewer you defined in step one. As you go, write down every screen you might want to show in the video. Do not filter yet. Just list them. For a typical B2B SaaS product, you might end up with eight to fifteen screens or states on your list.
Now cut the list. Pick the three to five screens that do the most work. These are the screens where the product's value is most visible. For most SaaS products, that means the main dashboard or overview, one or two core workflow screens where the key actions happen, and a results or output screen that shows what the user gets after using the product. Put those screens in a logical order. Usually that order follows the user's workflow, not the product's navigation menu. The viewer wants to see how they will use the product, not how the product is organized internally.
Write each screen on its own row in your storyboard table. You now have the visual spine of your video.
Minutes twenty through thirty-five: write the narration.
Go back to your storyboard table and write the narration for each screen. The narration should do one of three things at any given moment. It should name the problem the screen solves, explain what the viewer is looking at and why it matters, or tell the viewer what to do or what happens next.
Keep each narration chunk short. Three to five sentences per screen state is usually the right amount. If you find yourself writing more than that for a single screen, it usually means you are trying to cover too much and you need to either add a screen or cut some content.
Read the narration out loud as you write it. Narration that looks fine on the page can be awkward to say out loud. If a sentence is hard to say, rewrite it until it is easy. This matters because your narration might become a voiceover, and it needs to sound like a person talking, not like a product spec.
Check that the narration and the visual are in sync for every row. If your narration references something specific, like a filter or a button, the screen you assigned to that row needs to show that thing clearly. If it does not, either change the narration or change the screen assignment.
Minutes thirty-five through forty-five: add timing and pacing notes.
Go through your storyboard and assign a rough duration to each row. You are not being precise here. You are just making sure the total adds up to the right length for your video type and that no single section runs too long relative to the others.
A common mistake is spending too long on the problem section and rushing the solution section. Viewers of SaaS product videos already know they have a problem. They came to see the solution. Give the problem section just enough time to create recognition, then move into the product screens quickly.
If your total time is running over, cut from the middle. The beginning and the end of a video are the most important parts. Viewers make decisions about whether to keep watching in the first ten seconds, and they remember the last thing they saw more than anything in the middle. Protect those sections and trim from the sections in between.
Also note in your storyboard where you want on-screen text to appear. On-screen text is useful for emphasizing a key point, labeling a feature name, or displaying a statistic. Do not use it on every screen because it becomes noise. Pick two or three moments where it adds real value and call those out in your storyboard.
Minutes forty-five through fifty-five: review and pressure-test.
Read through your complete storyboard from top to bottom. Ask yourself three questions.
Does every screen earn its place? If you removed one row from the storyboard, would the video still make sense? If yes, that row might not be necessary. Cut it or merge it with another row.
Does the narration tell a complete story? Someone who has never heard of your product should be able to read the narration column alone and understand what the product does, why it matters, and what to do next. If the narration is missing any of those pieces, add them.
Is the call to action clear and earned? The best CTAs in SaaS product videos feel like the natural next step after everything the viewer just saw. If your video ends with a CTA to book a demo but none of the video's content has built toward the demo experience, the CTA will feel abrupt. Make sure the last screen and the last narration line set up the CTA directly.
After this review, your storyboard is done. You now have a clear plan that any team member can use to move into production.
Minutes fifty-five through sixty: format and share.
Clean up the storyboard table, add a title with the video type and the target audience, and share it with whoever needs to approve or act on it. If you are the one doing the production yourself, you are ready to start capturing screens. If you are handing it off to a video tool or a team member, the storyboard gives them everything they need to get started without a briefing call.
If you are using a platform like Product Frames to generate your video, having this storyboard done first means you can make faster decisions about narration text, screen order, and timing when you are working inside the tool. The storyboard is your decision-making document. The video tool is where you execute those decisions.
For teams that manage multiple video types across different audiences, I recommend keeping a storyboard template that covers your most common video formats. A homepage hero template, a feature walkthrough template, and an onboarding module template will cover most of what a pre-Series B SaaS team needs. Adapt each one from your base structure and you will cut this process down to thirty minutes or less over time.
Keeping your SaaS product video storyboard useful after the first launch
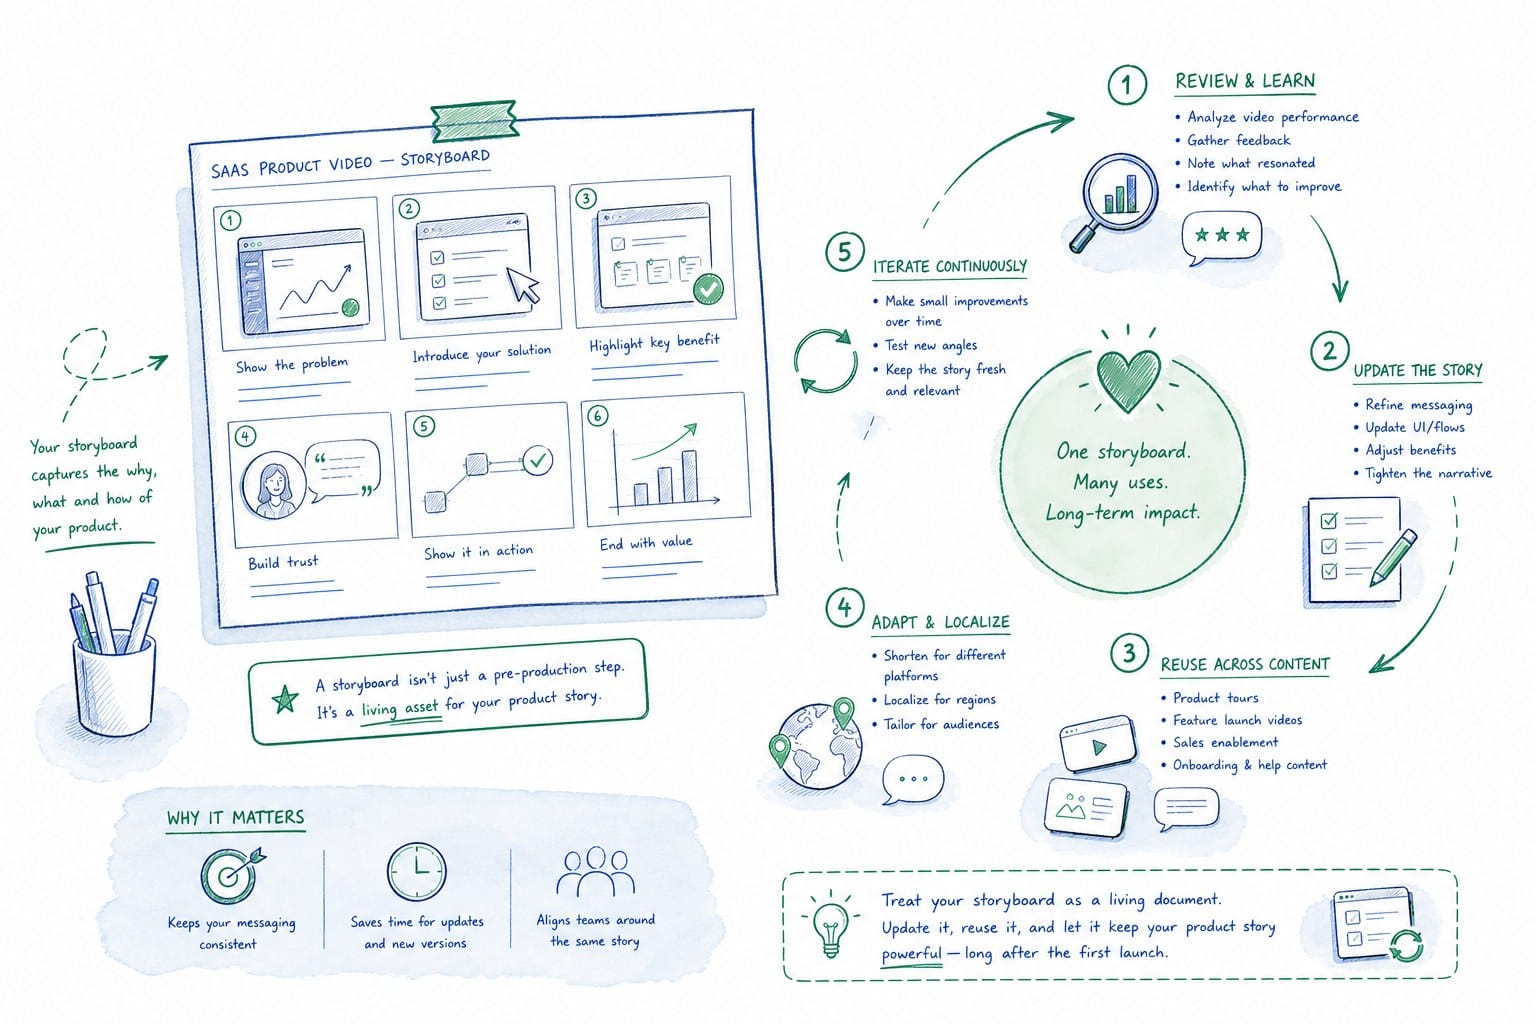
Here is a problem that almost every SaaS team runs into. You build a great product video. You do the storyboard work, you record the screens, you get the narration right. The video goes live on your homepage and your sales deck and your onboarding sequence. Then your product team ships a new release and changes the UI, adds a feature, or moves a menu item. Now your video shows a screen that no longer exists, and your onboarding video is actively confusing new users because the product looks different from what they are seeing.
This is one of the most common complaints I hear from product marketing managers and customer success teams at B2B SaaS companies. The video took weeks to make, and now it is already out of date. So they either leave the outdated video in place and hope no one notices, or they kick off another production cycle and start from scratch. Neither option is good.
The storyboard is actually where you prevent this problem, not where you solve it after the fact. When you build your storyboard, think about which screens are likely to change and which screens are stable. The core workflow screens, the ones that show how a user does the main thing your product does, tend to be more stable than secondary feature screens or settings pages. If you anchor your video on the most stable screens and avoid building whole sections around features that are in active development, you reduce how often you need to update the video.
Also think about whether your narration references specific UI labels. If your narration says 'click the blue Start button in the top right,' and your design team changes that button to say 'Get started' and moves it to the left sidebar next sprint, your narration is now wrong. Write narration that describes what the user is doing and why, not where a specific button is. 'From here, you kick off a new project' ages better than 'click the New Project button in the navigation bar.'
For teams that ship frequently, I recommend treating the storyboard as a living document. Keep it somewhere your team can access it, and add a column for the last-reviewed date for each section. When your product ships a change, someone on the team can check the storyboard quickly to see which video sections reference the changed area of the product and flag them for update. That is much faster than watching the whole video again to find what needs to change.
Customer success and enablement teams have a particularly acute version of this problem because their onboarding videos are often the first thing a new user watches, and accuracy matters more there than almost anywhere else. If a new user follows along with an onboarding video and the steps do not match what they see on screen, you have created confusion right at the moment when you most need clarity. I wrote more about how CS teams handle this in practice in this piece on how customer success teams keep onboarding videos current after every UI update.
For sales teams, the problem shows up differently. A sales rep is using a product walkthrough video in a proposal, and between the first call and the follow-up call, the product ships a new feature that is actually highly relevant to the buyer. But the video the rep sends does not mention it. The storyboard-as-living-document approach helps here too. When a new feature ships, someone can look at the storyboard for the sales walkthrough video and decide quickly whether it needs to be added.
If you are working with a video generation platform that allows you to regenerate or edit your video without starting from scratch, the storyboard becomes even more valuable. You already know the structure of your video and which sections reference which screens. When something changes, you update only the rows in the storyboard that are affected, then regenerate those sections. That is a fundamentally faster workflow than re-recording everything.
This is also worth thinking about when you are deciding which video types to build first. If you are a founder or a PMM at a pre-Series B SaaS company and you can only build one or two videos right now, choose the formats that will stay useful the longest. A homepage hero video that explains your product's core value proposition will stay relevant through multiple UI updates if you built the storyboard around stable screens and durable narration. A step-by-step UI tutorial for a specific workflow might go out of date every sprint. Prioritize accordingly.
Another dimension worth thinking about is distribution format. A video storyboard for a SaaS product that will only live on your homepage is simpler than a storyboard for a video that needs to work in four different contexts: homepage, LinkedIn, sales deck, and in-app onboarding. If you know you need multiple formats, build that into the storyboard from the start by identifying which sections are format-agnostic and which sections need to be adapted. The core problem-solution-outcome structure usually works across all formats. What changes is the length, the aspect ratio, and sometimes the call to action. For more on how to think about using the same product footage across different parts of your marketing funnel, this piece on product-led growth video strategy: using product footage across the funnel covers the strategy in depth.
One more thing I want to address is the question of tooling. Some teams spend a lot of time deciding which tool to use for their video storyboard before they actually do the storyboarding work. My advice is to use the simplest tool that your team will actually use. A Notion table, a Google Doc with a three-column table, or even a plain text file with clear section labels will get the job done. The storyboard is a planning document. It does not need to be a polished deliverable.
Where tooling decisions do matter is in video production and regeneration. If you are comparing different approaches for actually creating the video, you want to think about how easy it will be to update the video when the product changes. That is a different conversation from the storyboard itself, but it is one worth having before you commit to a production workflow. I have seen teams use tools that are great for one-time production but require full re-recording for any update, and that ends up being a bottleneck. Understanding the tradeoffs between different production approaches is covered well in this comparison of Arcade vs Loom for SaaS product video: a B2B team comparison.
The bottom line is that the storyboard is where you make the decisions that determine whether your SaaS product video works and whether it stays useful after launch. Spending an hour on it before you start production will save you many more hours of rework later. The process I described above is repeatable, and it gets faster every time you use it. By the third or fourth video, you will have templates and patterns that let you move even faster without sacrificing quality.
Ready to take the next step?
If you want to put your storyboard into production without a full recording and editing cycle, Product Frames turns your product URL or existing footage into an editable, narrated video you can regenerate after every product update. It is built specifically for SaaS teams who need product videos that stay current. Start there and see how much faster the whole process becomes.