How to create a product demo video without hiring a video team

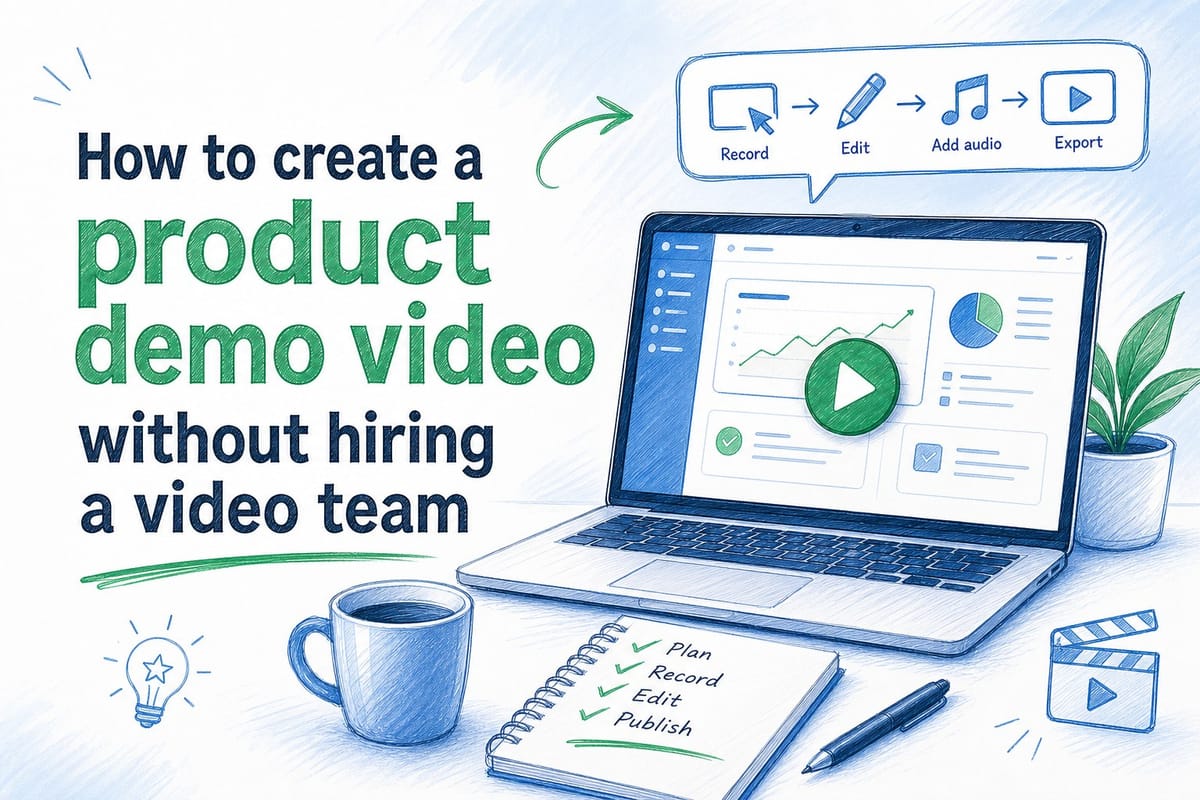
Table of contents
1. Plan the video before you record anything
2. Record and assemble your demo without a production crew
3. Keep your demo video current after every product update
Most SaaS teams I talk to want a great product demo video on their homepage. They know it helps visitors understand the product faster, and they know it can shorten the sales cycle. But when they think about actually making one, the mental image is a multi-day shoot, a screen-recording session that goes sideways, a freelance editor who takes two weeks to turn around revisions, and then another round of that same process six months later when the UI changes. So the video never gets made, or it gets made once and stays on the site long after it no longer reflects the real product. Neither outcome is good. The good news is that making a solid product demo video no longer requires a dedicated video team, a big budget, or a long production timeline. In this guide, I will walk through exactly how to create a product demo video from planning to publishing, using tools and workflows that keep the whole process inside your team.
Plan the video before you record anything
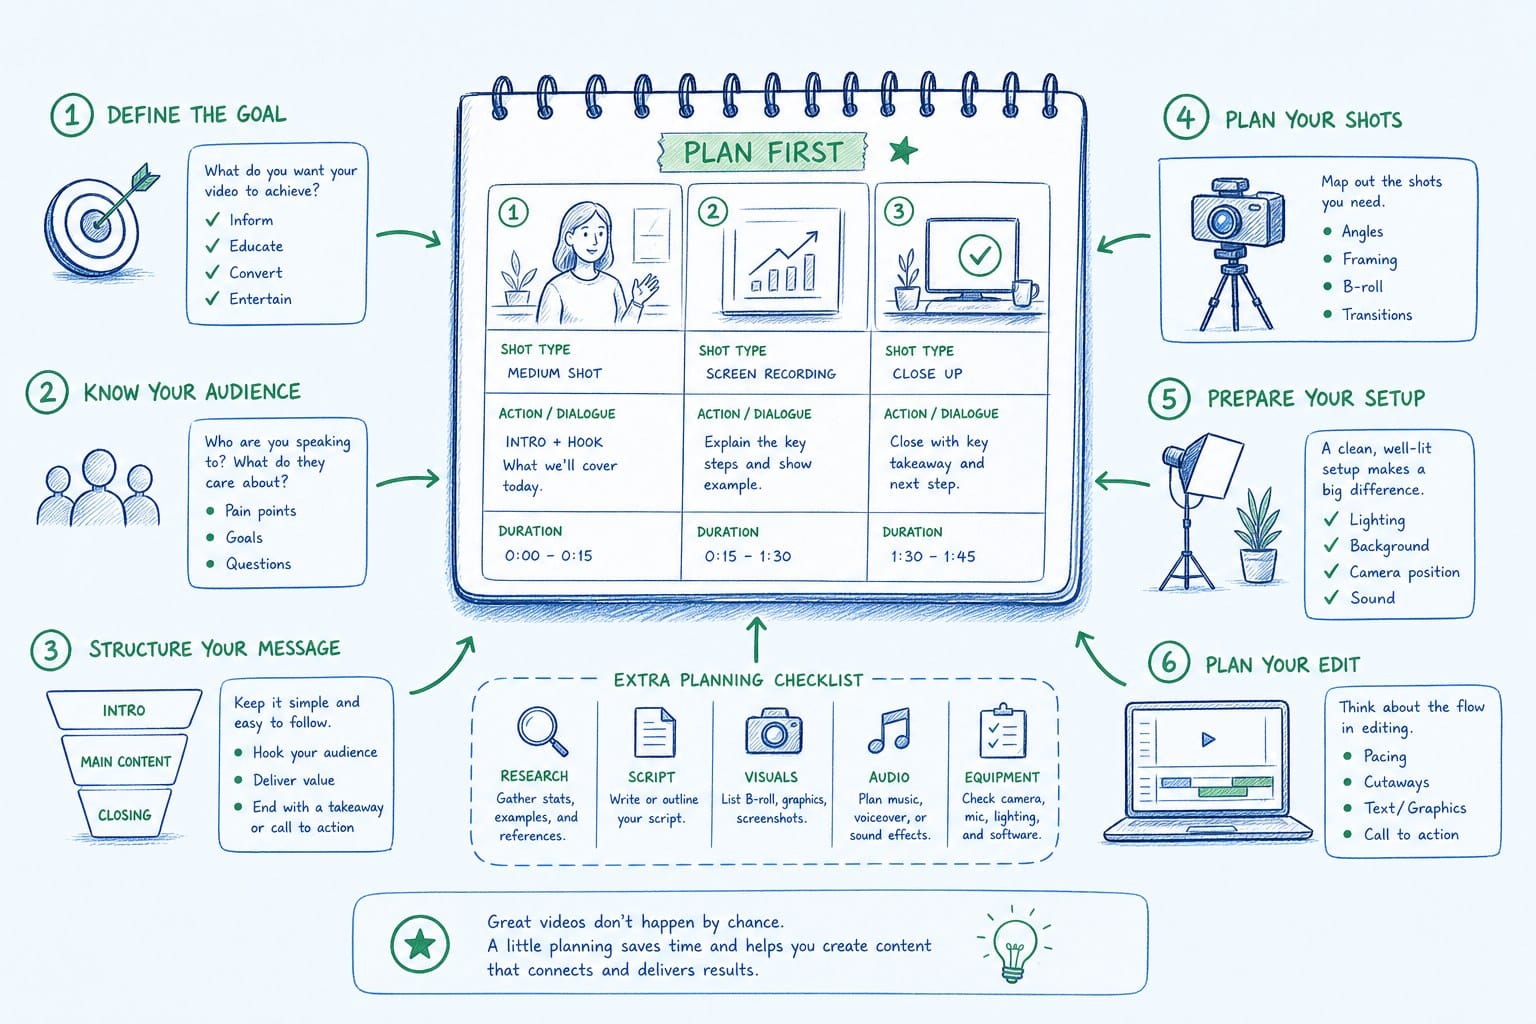
The single biggest reason product demo videos fall flat has nothing to do with production quality. It has everything to do with a missing plan. Teams fire up a screen recorder, start clicking through the product, and end up with a twelve-minute recording that covers every feature equally and answers no particular question for any particular viewer. That video never gets used.
Before you record a single frame, answer these four questions. Who is watching this? What specific problem do they have right now? Which part of your product solves that problem most clearly? And what do you want the viewer to do after the video ends?
Those four questions sound simple, but most teams cannot answer all of them precisely before they start recording. If you cannot answer them, your video will try to be everything to everyone and end up being useful to no one.
For example, if you are a project management tool targeting engineering managers at growth-stage startups, your viewer is not a generic buyer. They care about reducing the time their team spends in status meetings. Your video should show exactly how your product eliminates that pain, not every feature in the left nav. The engineering manager watching your homepage video does not need to see your billing settings or your admin panel. They need to see their specific problem get solved in a way that looks fast and obvious.
Keep the video short. Data from Wistia consistently shows that videos under two minutes hold viewer attention far better than longer ones. For a homepage hero video or a sales deck attachment, ninety seconds is a strong target. For an onboarding walkthrough that lives inside a customer portal, three to five minutes is reasonable because the viewer has already committed to learning the product. The mistake most teams make is using the longer format when they should use the shorter one. When in doubt, cut.
Write a script before you touch the screen recorder. A script does not have to be formal. It can be a bullet list of the three or four moments you need to show, paired with a sentence or two of narration for each moment. Writing it out forces you to make decisions about what to include and what to cut. Those decisions are much harder to make after you have recorded an hour of footage and are staring at a timeline trying to figure out what to keep.
Here is a simple script structure that works well for most B2B SaaS demo videos. Open with the problem in one sentence. Something like: managing customer onboarding across five tools means things fall through the cracks. Then show the product doing the specific thing that solves that problem. Walk through two or three concrete moments, not a general tour of the interface. Close with a clear outcome and a direct call to action.
That structure works because it mirrors how a good salesperson runs a live demo. They name the pain, they show the fix, and they tell the prospect what to do next. Your video should do the same thing.
If you are a product marketing manager, this planning step is also where you align with sales on messaging. The worst outcome is a demo video that uses different language than the deck your account executive sends to the same prospect. If the video calls a feature a workflow and the deck calls it an automation, that inconsistency creates doubt in the prospect's mind. Lock the messaging before production starts, even if it just means a fifteen-minute conversation with the sales lead.
One more thing on planning: decide early whether you need multiple versions. A homepage hero video is often a landscape crop. A LinkedIn clip might need a square or vertical format. A sales deck video might need no background music and a cleaner close without an animated logo. If you know going in that you need three formats, you can record with that in mind instead of trying to retrofit footage later. Retrofitting is always slower and produces worse results than planning for the variants upfront.
Also think about whether you need versions for different audiences. A video aimed at an IT administrator showing security and permissions controls is a different video than one aimed at a marketing director showing reporting and campaign tracking, even if both videos are about the same product. If your sales team is pitching different personas in the same week, one generic video serves neither of them particularly well. Two shorter, focused videos serve both of them much better.
Once you have your target audience, your core message, your script outline, and your format requirements written down, you are ready to actually make the video. Most teams skip this step entirely or do a half-version of it in their heads while already recording. Do not skip it. The thirty minutes you spend on a real written plan will save you three hours of re-editing later.
Record and assemble your demo without a production crew
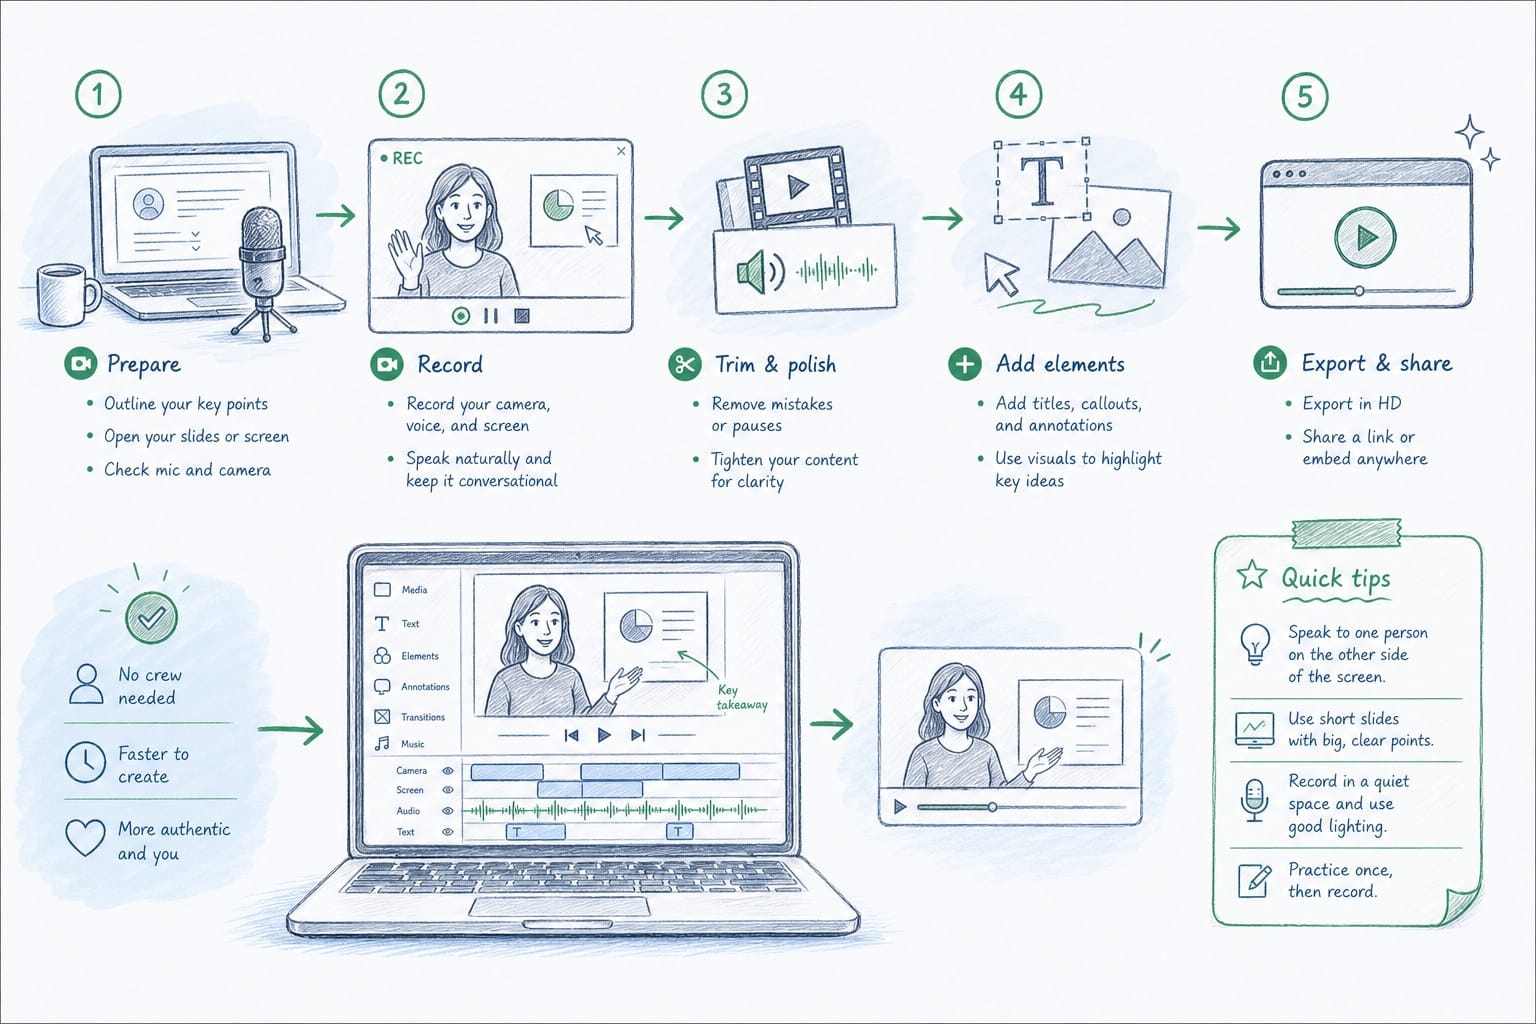
Now that you have a plan, the recording process becomes much more manageable. You do not need a camera crew, a green screen, or a professional studio. You need a clean product environment, a reliable screen recording setup, and a clear idea of which flows you are capturing.
Start by setting up a clean demo environment. This means a product account loaded with realistic but not sensitive data, a browser window with no personal bookmarks showing in the toolbar, and all notifications turned off. Small things like a cluttered browser bar or a Slack notification popup mid-recording look unprofessional and pull the viewer's attention away from what you are trying to show. Take five minutes to clean this up before you start recording. It is one of those things that is almost invisible when done right and immediately noticeable when done wrong.
For the data in your demo environment, use realistic numbers and names rather than obvious placeholders. A dashboard showing five clients named Client A through Client E reads as a prototype. A dashboard showing five clients with real-sounding company names and realistic revenue figures reads as a working product. Viewers make fast judgments about product maturity based on what the data looks like, even when they know it is demo data.
For screen recording, the specific tool matters less than the settings. Record at the highest resolution your screen supports. On a retina display, that is typically 2560 by 1600 or higher. High resolution gives you room in post-production to zoom in on specific UI elements without the image going soft. If you record at a low resolution and then zoom in on a specific button or data cell, the pixel quality degrades visibly and makes the video look rushed. Record the full screen rather than a browser window crop if you can, and then crop precisely in editing.
Record each section of your script separately rather than trying to capture the whole video in one continuous take. If your script has three product moments, record three separate clips. This makes editing far easier. Each clip should start a beat before the action you want to show and end a beat after it. That buffer gives you clean edit points so you are not cutting on a frame where something is mid-motion.
When you are recording, slow down your mouse movements slightly and make each click deliberate. Fast, jerky mouse movements are hard to follow on video. Viewers need a moment to track where the cursor is going. If you are opening a dropdown or navigating to a new page, move the mouse at about half the speed you would use naturally. It will look and feel too slow when you are recording it, and it will look exactly right to a viewer watching the finished video.
Voiceover narration is one area where teams often get stuck. Writing the script is done, but now someone has to actually read it into a microphone. If you are a founder or a PMM, recording your own voice is the most direct path. You do not need a recording studio. A USB condenser microphone in the fifty to one hundred dollar range, in a quiet room, produces perfectly usable audio. Closets lined with hanging clothes work surprisingly well as improvised recording spaces because the fabric absorbs echo and flutter that would otherwise make the narration sound hollow.
Record the narration in short segments that match your script sections rather than reading the whole script in one take. Segmented recordings are much easier to edit and re-record if one section does not land right. If you stumble on a sentence, pause for two seconds and re-read that sentence rather than starting the entire clip over. In editing, you can cut the stumble and use the clean re-read without any visible seam.
If recording your own voice feels like a genuine barrier to getting the video made, AI narration tools have improved substantially and can produce natural-sounding voiceover from a text script in a few minutes. The key is to choose a voice that fits the tone of your brand and to edit the script carefully before you generate the audio, because the narration will sound exactly as natural as the writing. Choppy sentences become choppy audio. Clean, direct prose becomes clean, direct narration.
Once you have your screen recording clips and your narration audio, you need to assemble them. Traditional video editing software like Premiere or Final Cut has a steep learning curve and is overkill for most product demo videos. The more relevant question is how to assemble and style the video in a way that keeps it maintainable over time, which the next section covers in detail.
A few assembly principles worth keeping in mind regardless of what tool you use.
Pace the video to the narration, not the other way around. The narration is your story. The screen recording is the visual evidence that backs up that story. If the narration says the report generates in seconds, your screen recording clip should last roughly as long as it takes to say that sentence. Do not pad a clip to fill dead air, and do not rush through it so fast the viewer cannot register what they are seeing.
Use zooms and highlights to guide the viewer's eye. When you are calling attention to a specific button, a specific number on a dashboard, or a specific field in a form, zoom in on it. Viewers should never have to scan the screen looking for what you are referring to. A subtle animated zoom onto the relevant UI element does the work of pointing without being visually aggressive. This is one of the simplest and most effective things you can do to make a screen recording feel polished rather than raw.
Keep transitions simple. A clean cut or a brief fade is almost always the right choice. Flashy transitions with spins, swoops, or three-dimensional effects pull the viewer's attention away from the product and toward the editing. They also date the video quickly. Cut or fade, then move on.
Add captions or on-screen text if the video will be watched without sound. On LinkedIn and in most email clients, autoplay videos are muted by default. A significant portion of your audience will watch the video without ever turning the sound on. If your video relies entirely on narration and has no on-screen text labels or callouts, those viewers will have no idea what they just watched. Short caption lines or brief on-screen text callouts for each key moment solve this without requiring a full verbatim transcript overlay across every frame.
For teams that distribute the video in multiple aspect ratios, this assembly stage is where you create the variants. Record once at the highest resolution, then export cropped versions for each format you need. Landscape at 16:9 for the website and desktop contexts. Square at 1:1 for the LinkedIn feed. Vertical at 9:16 for LinkedIn mobile or short-form channels. Creating these variants manually adds time to every update cycle, which is one of the practical reasons platforms built specifically for product video automate this step.
Keep your demo video current after every product update
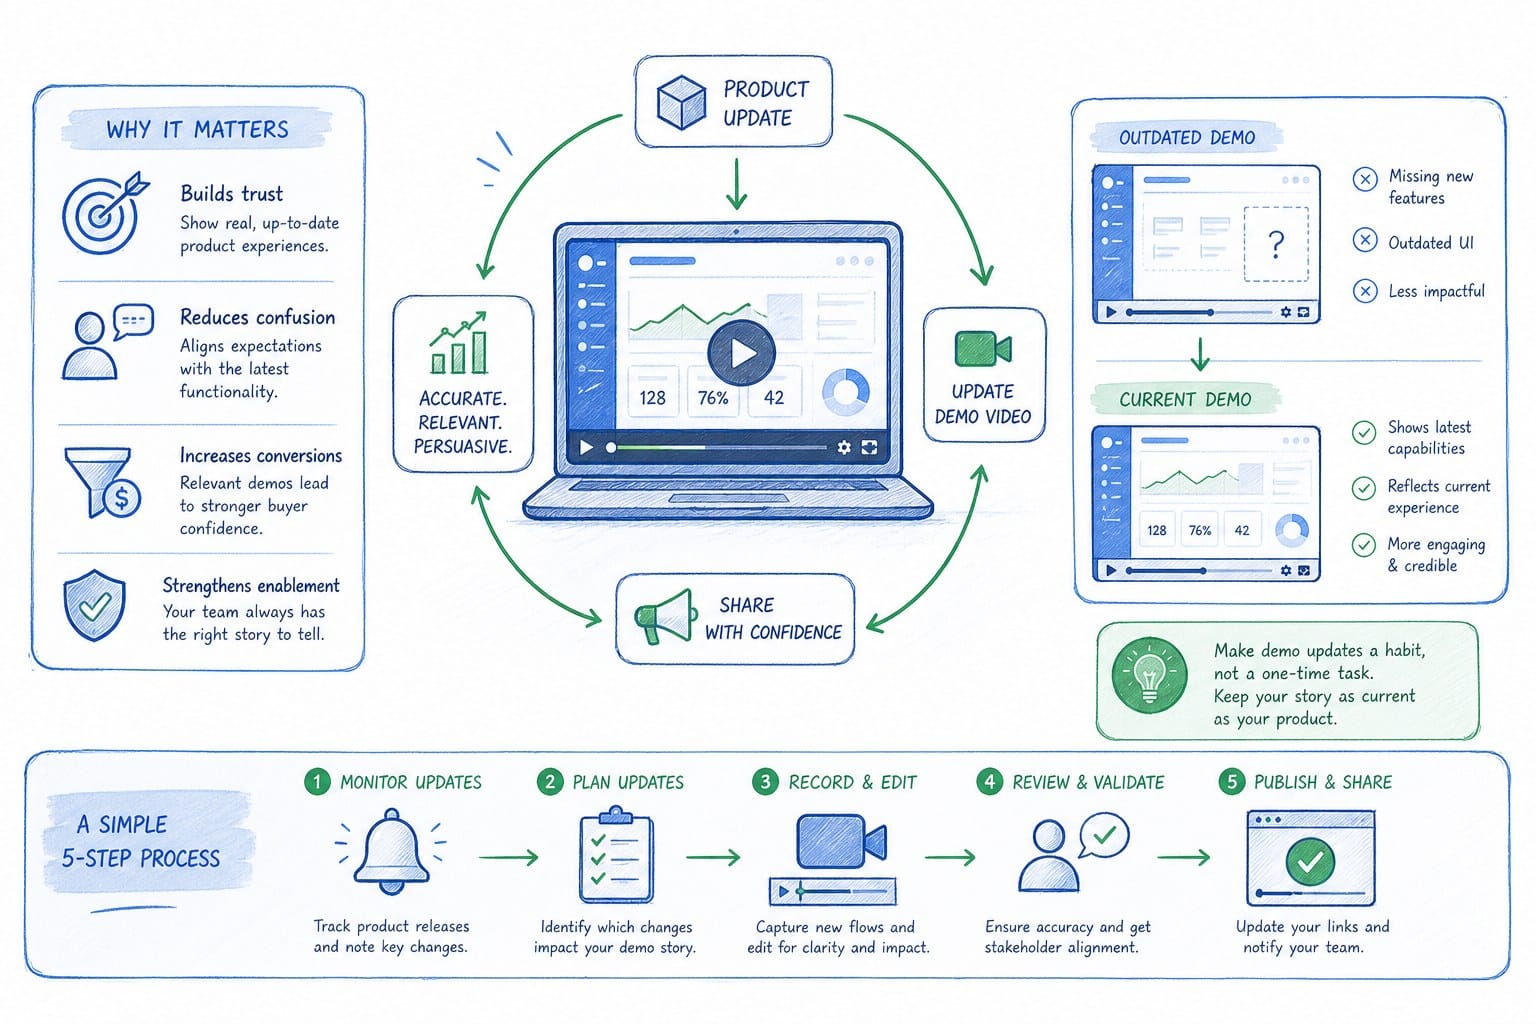
Here is the problem that most articles about how to create a product demo video do not address: the video you make today will be wrong in sixty days.
B2B SaaS products ship updates constantly. Navigation changes. Modals get redesigned. New features get added to screens that were in your video. The dashboard your video spent forty-five seconds on looks different after the next sprint. And now the video on your homepage shows a product that does not match what your trial user sees when they log in for the first time. That mismatch erodes trust immediately.
Think about what that mismatch communicates to a new trial user. They watched your homepage video, formed a mental model of where everything is, signed up, logged in, and now the screen in front of them looks different than the one they were expecting. Even if the underlying product is better, the visual disconnect creates friction and raises doubt. If the video is already wrong, what else might be wrong?
For customer success and onboarding teams, this is an especially painful problem. An onboarding video that references a button that has been renamed or moved is actively harmful. It makes the product feel harder to learn, not easier. A new user following an onboarding video that says click the Settings icon in the top right corner, when that icon has been moved to the left sidebar in the latest release, is going to feel confused and unsupported. That is the opposite of what an onboarding video is supposed to do.
For sales teams, a demo video attached to a proposal that shows an outdated UI creates an unnecessary credibility problem. If the prospect asks about a screen in the video that looks different from the live demo they just saw, the account executive has to explain the discrepancy in real time. That is a conversation that undermines confidence in the product and in the team, and it is entirely avoidable.
The traditional answer to this problem is to re-record. Most teams either accept the maintenance burden and re-record every few months, or they stop maintaining the video after the first update and leave an outdated version running indefinitely. Neither approach scales. Re-recording every few months works when you have one or two demo videos. When you have a library of ten or fifteen videos covering different product areas, different buyer personas, and different stages of the funnel, re-recording all of them after every significant release is not realistic.
The better answer is to treat your demo video as a living asset built inside a system that makes regeneration fast.
This is the core idea behind Product Frames. Instead of recording a video once and manually editing it through every product change, you input a product URL or existing product footage and the platform generates an editable, narrated video composition. When your product updates, you regenerate the video from the updated product state. The structure, the narration logic, and the visual style stay consistent across regenerations. The footage reflects the current UI.
For a PMM managing a library of sales walkthrough videos across a product that ships updates every two weeks, this changes the math entirely. Instead of scheduling a re-recording session after every significant release and then waiting on an editor to turn around the changes, you regenerate the affected video, review it, and publish. The time cost of keeping the video current drops from days to hours.
Product Frames uses a credit system where one credit equals one second of finished video output. This makes it straightforward to plan and budget for a library of videos rather than treating each video as an unpredictable one-off project. A ninety-second homepage hero video costs ninety credits. Regenerating it three months later when the UI changes costs ninety more credits. The cost of maintenance is proportional to the length of the content, not to the hours of human editing time involved. That predictability matters when you are trying to build a sustainable content operation rather than a series of expensive one-time projects.
Beyond the tooling, there are a few operational practices that help teams keep demo videos current and useful over time regardless of what platform they use.
Build a naming and version system for your video assets from day one. Even a simple folder structure that captures the product area, the target audience, and the date of the last update saves significant time when you need to find and refresh a specific video six months later. Without a system, demo videos accumulate across Google Drive, Notion, email attachments, and individual laptops, and nobody knows which version is the one currently on the website. This sounds like basic asset management hygiene, and it is. It also regularly gets skipped until it becomes a real problem.
Include a brief description with each video asset that notes what the video covers, which product flows appear in it, and when it was last reviewed against the current product state. Three sentences in a doc header or a Notion property field is enough. When a designer or PM ships a change to one of those flows, they can search the asset library and immediately see which videos need to be updated.
Review your demo videos on a defined schedule rather than only reacting after something breaks. A quarterly review where someone watches each public-facing video and compares it against the current product state catches drift before it creates a real problem for prospects or new users. This review does not have to be elaborate. It is a one-hour audit, not a production meeting. You watch the video, you check the relevant product screens, and you note anything that no longer matches. Then you schedule the update.
Tie that review cadence to your release roadmap so you know in advance which videos will need updating after the next significant release. If the product team is redesigning the reporting dashboard next sprint and your onboarding video has ninety seconds of footage showing that dashboard, you know before the release ships that the video will need to be updated. You can queue the regeneration immediately after the release rather than discovering the mismatch three weeks later when a customer support ticket comes in.
Create a simple communication channel between product and whoever owns the demo video library. If the product team knows that a specific flow or screen appears in a customer-facing video, they can flag when that flow is about to change. This is not a heavy process. It is a Slack message or a comment in the release doc that says hey, the onboarding checklist UI is changing in this sprint, someone should check if it appears in any active videos. That two-minute communication habit saves hours of reactive re-work.
Assign clear ownership for the demo video library and give that owner the system and budget to maintain the content without going through a full production cycle every time. The teams that keep their demo videos accurate over time are almost always the ones that have a single named owner, a defined review process, and a tool that makes updates fast. The teams whose demo videos go stale are usually the ones that treated video production as a project with a hard end date rather than as an ongoing content function with the same maintenance needs as their documentation or their sales collateral.
Making a great product demo video is genuinely achievable without a dedicated video team. The planning, the recording, and the assembly are all within reach of a single motivated PMM or founder with a clear script and a focused block of time. The harder problem, and the one worth investing in solving properly from the start, is keeping that video accurate and current as the product evolves. A video that shows a UI your prospects will never see is not a marketing asset. It is a liability. Build a maintenance process into your workflow from day one and the video becomes a compounding asset that supports your funnel continuously, not a recurring production project that eats your quarter every time the product ships something new.
Ready to take the next step?
If you want to see how Product Frames handles video generation and regeneration for SaaS teams, visit the platform to explore how it fits your workflow.